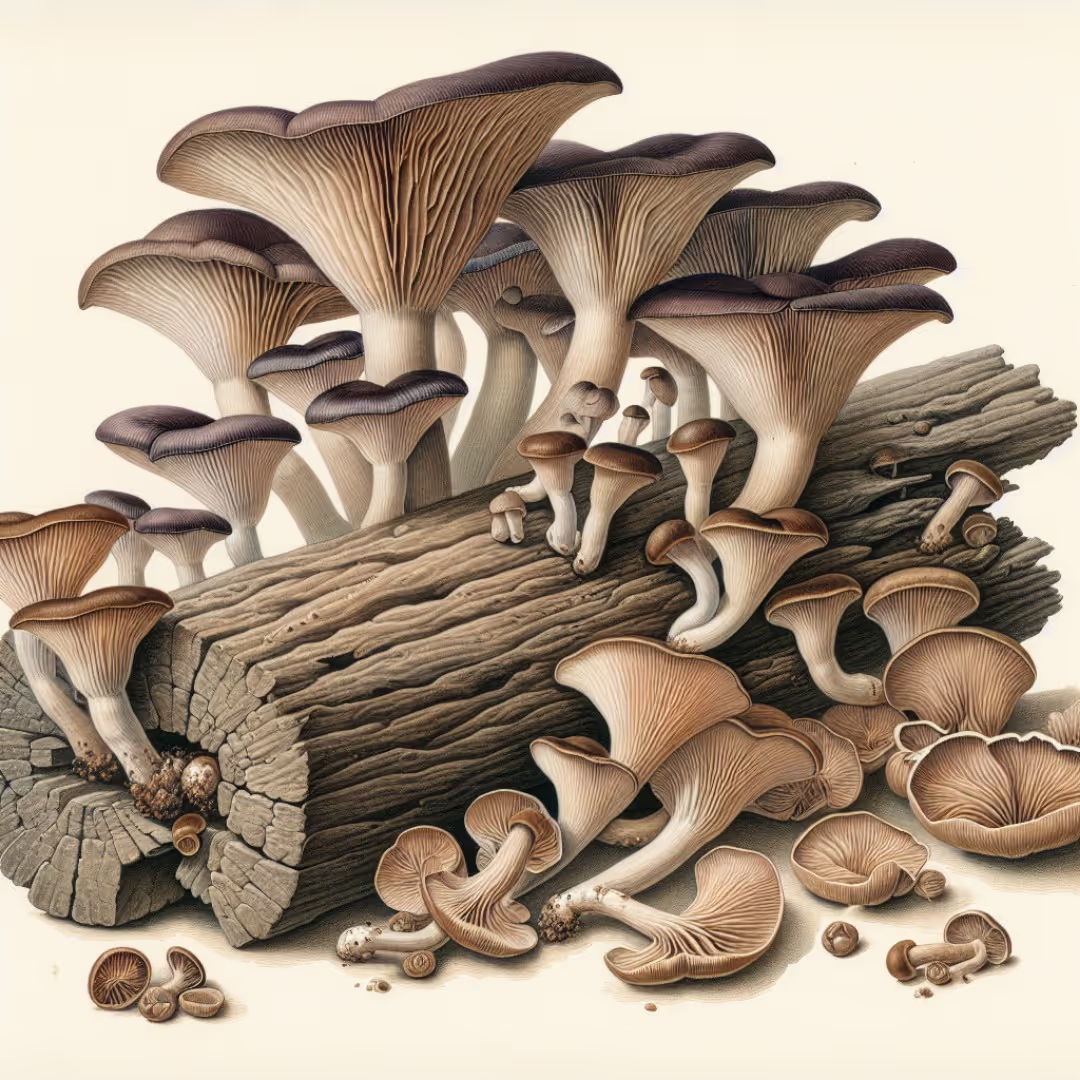
Growing Oyster Mushrooms at Home for Flavorful Harvests
Growing Oyster Mushrooms
Growing Oyster Mushrooms at home starts with pasteurized straw or sawdust, clean grain spawn, and 65–75°F air. Growing Oyster Mushrooms needs 85–95% humidity, steady fresh air, and diffuse light for clean caps. Growing Oyster Mushrooms on straw colonizes in 7–14 days; expect harvests in 2–3 weeks from first pins. Stick around for the cook’s payoff: umami clusters that sear hard and eat like steak.
Table of Contents
- Growing Oyster Mushrooms at Home for Flavorful Harvests
- Varieties that actually matter in a home setup
- Substrates that perform without drama
- Clean handling without a lab coat
- Three reliable substrate workflows
- Colonization and fruiting targets
- Tactile cues that beat any chart
- Kit or DIY
- My home fruiting rig that actually holds humidity
- Fast troubleshooting
Cheatsheet: Home Oyster Mushroom Bounty Made Simple
🍄 Varieties & Nutrition
Blue, pink, pearl, and golden—all fast growers. High in protein, fiber, B vitamins, immune-supporting beta glucans.
🛠 Tools and Products You’ll Need
- Lignocellulosic substrate (straw, coffee grounds, sawdust, or kits)
- Oyster mushroom spawn (grain or plug)
- Large bag/bucket or grow kit for fruiting
- Misting spray bottle
- Gloves, mask, utility knife
🌡️ Conditions for Best Yield
- Temp: 65-77°F (18-25°C)
- Humidity: 85–95% (mist 2x/day)
- Indirect light (avoid direct sun)
- Fresh air exchange needed
🧑🍳 6 Simple Steps
- Prep substrate: Soak, drain, and pasteurize (140°F/60°C, 1 hr) straw or sawdust
- Cool and mix spawn into substrate (5–15% by weight)
- Pack substrate tightly into bag/bucket (poke holes for fruiting)
- Incubate in dark at 75°F (24°C) for 10–14 days
- Move to indirect light, humid place. Mist daily
- Harvest clusters when caps unfurl (3–7 days after pinning)
💡 Tips for Flavorful Results
- Use fresh spawn for faster colonization
- Do not overwater—damp, never soggy
- Harvest before edges curl for best texture
- Substrate can produce 2–3 flushes per cycle
📈 Facts & Benefits
- Oyster mushrooms can double in size every 24 hours after pinning
- Low calorie, high nutrition, excellent meat substitute
- Grown indoors, fresh year-round, reduces grocery bills
Growing Oyster Mushrooms at Home for Flavorful Harvests
I first started Growing Oyster Mushrooms on a winter windowsill with a tote, a spray bottle, and a stubborn curiosity. The payoff tasted like browned scallops and walnut broth.
Oysters reward gardeners who respect moisture, airflow, and clean technique. Give them lignin and cellulose, then let the mycelium do what it evolved to do.
Varieties that actually matter in a home setup
- Pearl or grey oyster, Pleurotus ostreatus: forgiving and meaty, fruits in cool to mild rooms.
- Blue oyster, Pleurotus columbinus: tighter caps in cooler fruiting 50 to 60 F 10 to 16 C.
- Pink oyster, Pleurotus djamor: fast and flamboyant, loves 70 to 85 F 21 to 29 C, delicate shelf life.
- Golden oyster, Pleurotus citrinopileatus: nutty aroma, benefits from higher light and fresh air.
- Phoenix oyster, Pleurotus pulmonarius: tolerant of warm summers, handles swings.
I keep two strains rotating so at least one aligns with the season. Cool-loving in spring and fall, heat-loving in midsummer.
Substrates that perform without drama
- Pasteurized straw: cheap, fast colonization, classic oyster medium.
- Masters mix: 50 percent hardwood sawdust plus 50 percent soy hulls by weight, sterilized for big yields.
- Cardboard plus coffee: workable in a pinch, but watch contamination and moisture.
- Hardwood pellets: tidy substrate, just hydrate with hot water and supplement lightly.
Straw gives me speed and quantity, while sawdust blends give me density and better texture. I choose based on what I want to cook that month.
Clean handling without a lab coat
Wipe surfaces with 70 percent alcohol, flame sterilize blades, and bag trash out of the grow area. I put on gloves, mask up, and quiet the room to limit dust and spores in the air.
Spawn touches only cool, pasteurized or sterilized substrate. Slow down and you speed up.
Three reliable substrate workflows
- Hot water pasteurization for straw: chop to 2 to 4 inches 5 to 10 cm, soak in 160 to 170 F 71 to 77 C water for 60 to 90 minutes, drain to field capacity no drips when squeezed hard, mix in 5 to 10 percent grain spawn by wet weight, and bag with 0.5 inch 1.2 cm slits for fruiting later.
- Lime cold pasteurization for straw: submerge in clean water adjusted with food grade hydrated lime to pH above 11 for 12 to 18 hours, rinse briefly, drain, then inoculate as above.
- Masters mix sterilization: hydrate to reach 60 to 65 percent moisture, load into filter bags or jars, sterilize at 15 psi 121 C 250 F for 90 to 120 minutes, cool overnight, then inoculate at 10 percent spawn in still air or under a flow hood.
For masters mix I run smaller 1 to 3 pound 0.45 to 1.36 kg blocks at home for safer margins. Large blocks magnify mistakes.
Colonization and fruiting targets
- Colonization: 68 to 75 F 20 to 24 C, dark or indirect light, no fresh air exchanges needed, 10 to 21 days depending on substrate and strain.
- Fruiting: 55 to 75 F 13 to 24 C by strain, 85 to 95 percent relative humidity, gentle light 500 to 1000 lux, frequent fresh air to keep CO2 low for broad caps.
In a tote, I drill 1 inch 2.5 cm holes every 6 inches 15 cm on all sides and stuff lightly with polyfill to balance humidity and airflow. A small fan on a timer across the room refreshes the air without desiccating pins.
Biological efficiency of 100 percent means 1 pound of dry substrate yields 1 pound of fresh mushrooms. Many home oyster grows on straw land between 50 and 150 percent depending on cleanliness, strain, and moisture control. Source: Extension guides from Penn State and Cornell Small Farms Program.
Tactile cues that beat any chart
Substrate at field capacity feels like a wrung sponge and leaves a faint sheen on your palm. Colonized blocks smell like clean anise and forest tea, never sour or yeasty.
Harvest when caps are mostly flat and edges still slightly inrolled. Wait too long and you invite a spore blizzard and flabby texture.
Kit or DIY
- Kits: 20 to 40 USD 18 to 37 EUR, typically 1 to 3 pounds 0.45 to 1.36 kg total yield over 2 to 3 flushes, low mess, fast gratification.
- DIY: lower long term cost per pound, custom substrates, higher yield potential, requires sanitation and basic equipment.
I keep a kit on the counter for quick meals and run DIY blocks in a tote for volume. That mix spreads risk and keeps dinner interesting.
My home fruiting rig that actually holds humidity
Clear tote, perlite layer rinsed and drained, egg crate to elevate blocks, and a cheap inkbird style controller on a mini humidifier. I mist twice a day when RH dips below 85 percent.
A clip light with a 6500 K bulb set to 12 hours on steadies pinning. I crack the lid for 10 minutes after misting to dump CO2.
Fast troubleshooting
- Long stems, tiny caps: increase fresh air, drop CO2, add more holes or run the fan more often.
- Dry edges cracking: raise humidity, add a humidity tent or mist more frequently with fine droplets.
- Green patches: likely Trichoderma, quarantine or discard the block and review sanitation steps.
- Wet slimy grains and sour odor: bacterial contamination, reduce spawn moisture and cool the room.
I cut failed blocks open to autopsy texture and smell. Patterns teach faster than guesses.
Numbers gardeners ask me for
- Spawn rate: 5 to 10 percent of wet substrate by weight for straw, 10 percent for sterilized sawdust blends.
- Light: comfortable reading light, 500 to 1000 lux, indirect.
- pH: straw after pasteurization rides near neutral, masters mix sits around 5.5 to 6.5.
- Humidity: 85 to 95 percent in fruiting, 70 to 80 percent during pin set to avoid bacterial blotch.
Small adjustments beat big swings. I move one variable at a time.
Top picks by use case
- Fast weeknight cooks: pink or phoenix on straw for speed and aroma.
- Dense steaks and grilling: blue or pearl on masters mix for thick caps.
- Hot apartment summers: phoenix or golden with more airflow and light.
- Cool basements: blue with tighter clusters and firm texture.
I plan the strain around the dish, like choosing a tomato cultivar for sauce or slicing. Culinary intention guides the substrate choice.
Flavor, texture, and kitchen tactics
High heat and patience make oysters sing. I dry-sauté to purge water, then finish with oil, garlic, and a splash of sherry vinegar.
For a smoky hit, I roast whole clusters at 450 F 232 C for 12 to 16 minutes until edges crisp. The pan drippings taste like concentrated bouillon.
Oyster mushrooms carry 20 to 30 percent protein by dry weight and deliver beta-glucans that show immune-active properties in published nutrition research. Source: USDA and peer reviewed literature summarized by university extensions.
Storage and spore sanity
Refrigerate in a paper bag at 34 to 39 F 1 to 4 C for up to one week. I sauté and freeze in portions if I overshoot harvest day.
Heavy spore loads can bother lungs in tight spaces, so harvest earlier and ventilate the room. Gardeners with allergies should fruit in a garage or porch.
Garden integrations that actually help
Spent blocks get crumbled into woodchip paths to inoculate them and suppress weeds. After a week of rain they often throw bonus clusters where chips meet shade.
I compost the rest with carbon heavy browns, then use the cured material under brassicas and corn. Avoid seedling trays because the biology runs hot and hungry.
Buying smart without overbuying
- Grain spawn: choose fresh, date stamped bags from reputable suppliers that ship cold in summer.
- Pressure cooker: 23 quart 21.8 L units fit 4 to 6 bags or 7 quart jars, a sweet spot for home growers.
- Humidification: ultrasonic plus a simple controller keeps fruiting stable without constant misting.
- Filters and bags: 0.2 micron filters for sterilized substrates, 0.5 micron is fine for grain spawn.
I buy spawn in smaller, more frequent orders to keep vigor high. Old spawn saves pennies and costs weeks.
Why oysters outpace other fungi in a garden household
Shiitake on logs asks for months and a shady corner, while oysters give lunch in 3 to 5 weeks. Lions mane wants tight sterility and steady humidity, oysters forgive and keep fruiting.
Pleurotus also preys on soil nematodes, a tidy reminder that in the beds and in the tote, ecology is strategy. That predatory streak lines up with their appetite for tough plant residues.
Safety and sanitation checklist
- Clean tools, gloves, and a wipedown routine for each session.
- Good ventilation in fruiting, no standing water on surfaces.
- Clear labeling of dates, strain, and substrate for each bag or block.
- Immediate discard of any sour or vividly green block.
I treat the grow like a sourdough starter with boundaries. Care in, quality out.
Benchmarks from credible sources you can trust
Penn State Extension’s home oyster guides and Cornell Small Farms Program both publish clear parameters for temperature, humidity, and biological efficiency. I keep their ranges taped to my tote lid alongside my own logs.
NC State and the University of Wisconsin have open extension notes on pasteurization, contamination patterns, and spawn handling that mirror what I see day to day. These are field tested, not fantasy.
Expect first pins 3 to 10 days after moving colonized blocks to fruiting conditions if humidity and fresh air are dialed. Consistency builds momentum and reduces contamination risk. Source: University extension production guides and commercial grower benchmarks.
One clean, repeatable routine
- Prep substrate and containers, then clean the workspace.
- Inoculate at the right spawn rate and seal with filters or fruiting slits.
- Colonize warm and quiet until blocks are fully white and firm.
- Introduce light, humidity, and fresh air, then stop fussing.
- Harvest early, rest the block 5 to 7 days, rehydrate, and fruit again.
This cadence turns a tote into a steady pantry supply. The garden benefits from the leftovers, closing the loop.
Frequently Asked Questions About Cultivating Oyster Mushrooms
What type of substrate benefits oyster mushroom growth?
Oyster mushrooms thrive best on substrates such as straw, coffee grounds, hardwood sawdust, and cardboard. Preparing the substrate by pasteurization or sterilization helps support strong mycelium growth and healthy mushroom clusters.
What environmental conditions encourage healthy mushroom fruiting?
Ideal conditions include high humidity levels around 80–90%, temperatures between 60–70°F (15–21°C), indirect natural or artificial light, and proper ventilation to allow fresh airflow. Maintaining these conditions helps prevent contamination and promotes productive mushroom growth.
How long does mushroom growth take from inoculation to harvest?
From initial inoculation, expect 2–3 weeks for full colonization of the substrate by mycelium. After initiating fruiting conditions, mushrooms usually appear within 7–14 days. The overall timeline averages around 4–6 weeks from inoculation to first harvest.
What steps prevent contamination during mushroom cultivation?
Maintaining proper hygiene and sanitation reduces contamination risks significantly. Use clean equipment, work in sanitized areas, pasteurize or sterilize substrates thoroughly, and frequently monitor growing environments. Providing fresh airflow and correct humidity control also discourages mold and unwanted growth.
How can you determine when mushrooms are ready for harvest?
Harvest oyster mushrooms as their caps become fully developed but before the caps flatten out completely. Mushrooms collected at this stage possess optimal texture and flavor. Gently twisting or cutting the clusters at the base helps protect the underlying mycelium and supports future fruitings.
Can cultivated mushrooms be grown multiple times from one substrate?
Yes, the substrate can often yield 2–3 subsequent mushroom flushes, provided the conditions remain optimal and contaminants are prevented. Flushes beyond the second or third typically yield smaller harvests and lower overall productivity, indicating the substrate is ready to be composted.
Growing Oyster Mushrooms is about respect and rhythm. Start clean. Use clean spawn and pasteurized substrate at field capacity. Hold humidity near 90 percent, keep fresh air moving, and give soft, indirect light. Cooler strains run at 55 to 65°F. Warm strains fruit at 65 to 75°F. Check daily. Small changes matter.
When pins pop, increase air exchange and mist walls, not caps. Harvest clusters as edges flatten with a slight curl. Cut flush, chill fast, cook the same day. Expect two to three flushes with a short rest between.
After the last fruiting, recycle the spent substrate as mulch or compost. It feeds beds and keeps your soil lively. For more homegrown fare to plate with your oysters, browse the plant guides. Steady hands, clean tools, and patience.
That is Growing Oyster Mushrooms at home.